“When you can measure what you are speaking about, and express it in numbers, you know something about it.”
— Lord Kelvin
Even though that quote wasn’t made about painting, I assume (considering he developed the Kelvin scale that’s not a huge leap on my part), it still speaks volumes about how important numbers actually are- And the only way you can get real numbers for a paint job is to take measurements (of any sort).
I am a big proponent of measuring the scope of a project for a 3 main reasons:
- Guessing is never consistent.
- It is easily teachable if you are in a position to scale.
- It helps you stay firm on pricing when someone asks for a discount because the measurements confirm, to you, that your price lines up with their specific needs- Even when they think their needs should cost less.
There are other reasons to measure a project, but that’s a topic for another day….
Because of my personal feelings on the importance of it, I’m always excited when I see a new tool or method to measure something. After doing some research, if the theory behind it seems promising I’m typically willing to invest in the product or software if I think it will allow me to do what I’m currently doing in a way that is either:
More efficient or more impressive to a potential client.
Finding a tool that does both is like hitting the jackpot on penny slots- It’s not really worth that much but it sure feels good.
It’s usually pretty easy to tell if something is more impressive than the current options. But, even if it is more impressive it still needs to do what it’s supposed to do.
And do it in a way that makes life easier, or has in impact in Awesome that makes up for making life just a little bit harder.
The Product
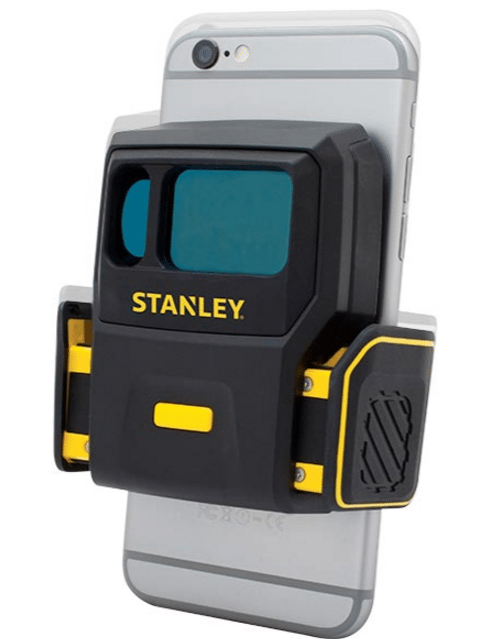
Let me introduce you to the Stanley Smart Measure Pro. It attaches to the back of your phone with padded arms and connects over Bluetooth. After you calibrate the eye of the laser, which takes about ten minutes, you have access to 2 primary measuring options.
- A laser that measures a straight line… like any other digital tape measure.
- A software that uses a picture to measure the total square feet of the surface area in the picture.
The Process Part 1 – Laser Measurements
The process of using a digital tape measure is pretty straight forward- you put the butt of the tool up against the wall, you push the button, and the screen displays the distance.
Stanley’s digital tape option works similarly, but with a few differences. The main difference is the laser is always measuring. Because of that, as you move your phone around, the distance changes. For all intents and purposes, it doesn’t affect much.
The other differences vs a standard digital measuring tape are:
1. You can’t freeze the measurement on the screen.
2. Since you have to look at the screen to read the measurement you have to lean against the wall, hold the phone in front of your face, and then add about a foot to get the correct distance.
Thankfully, for most interior painting, being within a few inches is more than adequate so I don’t consider either of those challenges a deal breaker.
Chatting with a client while taking measurements makes it a little easier to forget the number you just looked at (because it’s not frozen on the screen), but I do that occasionally anyways with my go-to digital measuring tool.
The Process Part 2 – Picture Based Measurements
The laser measuring part of the tool was adequate, but didn’t really add any Awesome beyond a normal digital tape measure so the second feature was the one I was really looking forward to. I was dreaming of being able to get home from a consultation and email the measurement photos to potential clients as my first follow-up.
So I set about trying to see if my dreams would become reality.
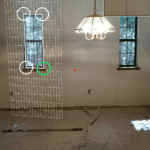
As mentioned earlier, you have to calibrate the camera before you can take accurate measurements. Once that’s done you have to complete a few steps before you get your measurement.
1. Take a picture of the first wall you want to measure.
2. Drag an outline around the largest rectangle on the wall as a guide.
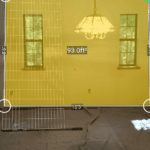
3. Drag an outline around the perimeter of the wall to measure the distance.
4. Repeat the process for every other wall you need to measure.
Now that may not sound too difficult, and it’s not necessarily a hard task, but trying to line up precise points while using only your finger on a (smaller than) 5 inch screen isn’t a quick process.
The Results
Interior
It takes roughly two minutes to measure one wall after you snap the picture. So measuring a single room takes around 10 minutes- without writing the numbers down anywhere.
I’m sure the process would take even longer if there was a tablet in my hands and I was trying to carry on a conversation with one or more homeowners.
The major problem with using this to measure interiors is that in an averaged size room you can’t get far enough away from the wall to measure the entire wall.
Exterior
I was a little discouraged after measuring out an interior and learning of the space limitation of the Smart Measure Pro; but exterior measuring is where I was really hoping to increase the Awesome anyways.
Measuring exteriors is more or less the same process as outlined above and it’s subject to the same shortcomings as outlined above. There’s not much I can add here, but I do like the fact that you can measure gable ends.
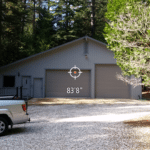
Like the inside measurements you have to get pretty far away to measure the whole surface. You can tell from these 2 pictures that your distance from the wall needs to be almost twice the width of the wall you want to measure. For some homes that won’t be a problem, but I think you could forget about using it in a tightly packed subdivision.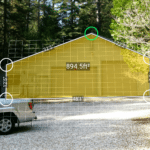
So, what is it good for then?
After testing out the Stanley Smart Measure Pro I see 2 main roles it can fill in my measuring arsenal.
1. A backup digital tape for interior measurements. The process of standing up against the wall to take the measurement makes me feel a little goofy. Because of that I wouldn’t want to use it as my main measuring tool. However, the rechargeable battery means I never have to worry about my main digital tape leaving me stranded mid-estimate just because I don’t keep spare AA batteries in my truck. I keep a normal tape measure as a backup now, but it can be clunky working around furniture with it.
2. A go to for measuring gable ends or the square footage of surfaces that are on the second story and need to be measured for repair or replacement. The exterior measurement I took of the front of that garage was within a foot of the actual width of the building. Considering I was over 80 feet away I think that’s pretty accurate. Gable ends that are on the second story or higher are typically difficult to measure from the ground and I would love to start putting a square footage price to them. Right now if a homeowner want’s them accented I just add an amount of money that seems good to me. Since I haven’t had a way to measure them, I haven’t bothered to track production rates when we paint them.
What could be improved?
Most of the shortcomings seem like they could have been discovered, and remedied, by more field testing. However I’m not an engineer, so I don’t know if either of these changes were doable in the space they were working with and I’m not an accountant so I don’t know if the changes would have stretched their target price point just a little too far.
It would have been nice if they added a secondary laser to the top of the unit or made the laser head swivel somehow. Either of those options would have made the process less goofy feeling and it definitely would have been an increase in sizzle over a regular digital tape.
A way to freeze that measurement on screen would have been great as well, but that is a limitation that would have been easier to overlook.
An “Awesome” option would have been a button that captured a low quality screenshot with the measurement and saved it to a folder so you could easily consult the pictures later.
On the picture measuring side of things- the app doesn’t use the whole field of view from the phones camera. This could have been a problem with the camera in my specific phone, but it still seems like an oversight. It could have been compensated for by including a wide angle adapter that would attach to the phones camera or giving the tool its own wide angle lens. The second option would have even eliminated the need to calibrate the device also, which would be a benefit for tech-challenged people (probably not their target market, but I’m just thinking in text right now).
So, is it more efficient or more impressive to a potential client?
I really wanted to like this tool, and while writing out this review I have been trying to convince myself that I must have missed something. Unfortunately this is just a situation where the usefulness of the tool fell short of my dreams.
Looking at the criteria I laid out earlier in this review, besides measuring gable ends, this tool didn’t do anything that can’t be done quicker with other products.
I’m not sure if it would be more impressive to a client since I didn’t test it out in a “pressure” situation.
Maybe I’m old-school, but backing really far away from someone’s house, snapping a picture, fumbling around on my phone for a few minutes and then repeating the process at least 3 more times didn’t seem like the best way to win over a potential client.
Have you tried the Stanley Smart Measure Pro or did I miss an awesome feature? Let me know your thoughts on it in the comments below. And don’t worry, I’m going to keep dreaming 🙂

Great post! I remember the first time I started out as a painter. I needed one of these measuring tools. However, this one takes it to another level.
No longer supported in their website. Is there a way to extract geotag info from the app? I used it for tree inventory and would like to have an spreadsheet with photo number (name), latitude and longitude, and tree diameter (measured within the app), and distance from camera to tree. Thanks.